Table of Contents
Elite Dangerous Exploration Guide
Elite Dangerous introduces formalised exploration. While in previous games in the series it was possible to explore uncharted systems, there was no in-game benefit for doing so. Elite Dangerous changes this by making exploration a central part of the game, including its own ranking system (alongside combat and trading).
How Exploring Works
Exploration in Elite Dangerous is a deliberate and concentrated effort - it is not just a race to jump into a system before anyone else and quickly run a scan to “claim” the system. To truly “explore” a system and appreciate the value of each planet or other body in a system, it must be scanned with dedicated equipment, one astronomical body at a time.
This scanning takes two steps:
- The “discovery” step, where you discover what bodies (i.e. planets, moons asteroid fields etc) are present in a system.
- The “scan” step, where you scan each unexplored body individually to get more details.
You can just complete the “discovery” step and move on to the next system, but you get more money the more you scan. Properly exploring a system involves using the “discovery” step to first locate bodies in a system, and the “scan” step to gather detailed information that is worth substantially more money than location alone.
Exploring & Fuel
To go any distance, you're going to need to have fuel. There won't be anywhere to buy it out in the unexplored areas, so fuel scooping is going to be essential.
Make sure that you have a decent fuel scoop and are well-practised at scooping fuel without getting any heat damage. There is a guide and details about the different scoop modules you can buy on the fuel scooping page.
As with the guide to fuel scooping, remember that not all stars will be scoopable. This is critical when planning your journey. Always try to have one of the scoopable stars (A, B, F, G, K, M, O, or KGB FOAM for mnemonic) available before you run out of fuel. You can see which star types a system has from the Galaxy Map, so if you find yourself in danger of running out of fuel, navigate to one of these systems. Note with caution that if the scoopable star is not primary (the leftmost in the list), you may need to super cruise to it, which takes time and additional fuel.
Step-by-Step guide to Exploration
When exploring you'll want to find a station close to the “edge” of known space to stock up on supplies before you start. You'll also want to assign your discovery scanner to a separate fire-group from your usual weapons so that you can “fire” it without firing your normal weapons; this can be done from your systems panel.
Of note, the discovery scanner does not need hardpoints to be deployed to function. In some configurations, however, firing the scanner will cause hardpoints to automatically be deployed. While exceedingly rare, exercise caution if you're exploring on a ship that has weapons in a populated system.
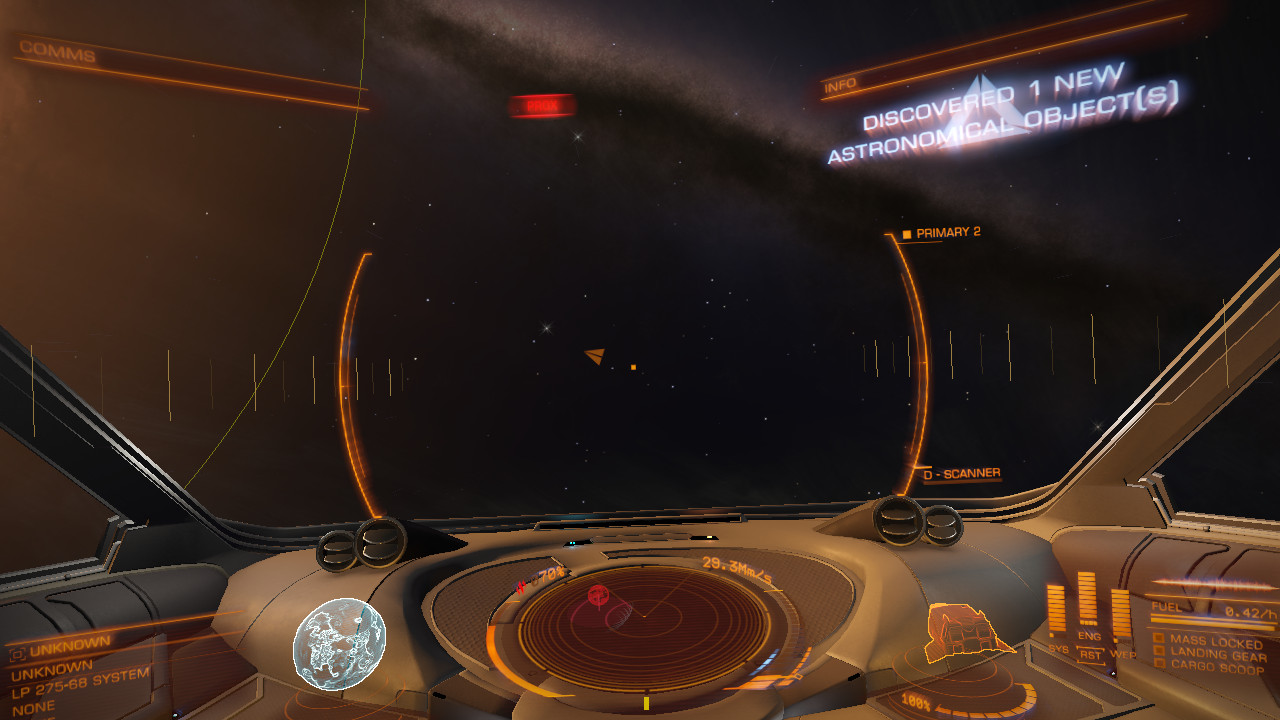 Fig 1 - Discovering a new astronomical body using the discovery scanner
- Find the unexplored system in the galaxy map that you would like to explore.
- Open the Galaxy Map and look for systems that have no system data available. These are ripe for exploring!
- Before you leave the station and head to the unexplored area, fill your ship's fuel. You'll be fuel scooping along the way, so while potentially useful, fuel in cargo should not be necessary.
- Launch and jump to the unexplored system.
- Discovery step
- When you arrive in the unexplored system you'll want to use the “Discovery Scanner” to scan for any new, unknown astronomical bodies.
- If you have not already done so, you may want to assign your discovery scanner to a firing group (e.g. your second firing group).
- To activate the discovery scanner make sure its firing group is selected and hold-down the fire button until the white progress bar completes.
- The basic discovery scanner will find all unknown astronomical bodies within about a 500 Ls range, so for large systems, you may need to super cruise through the system to find any outlying bodies.
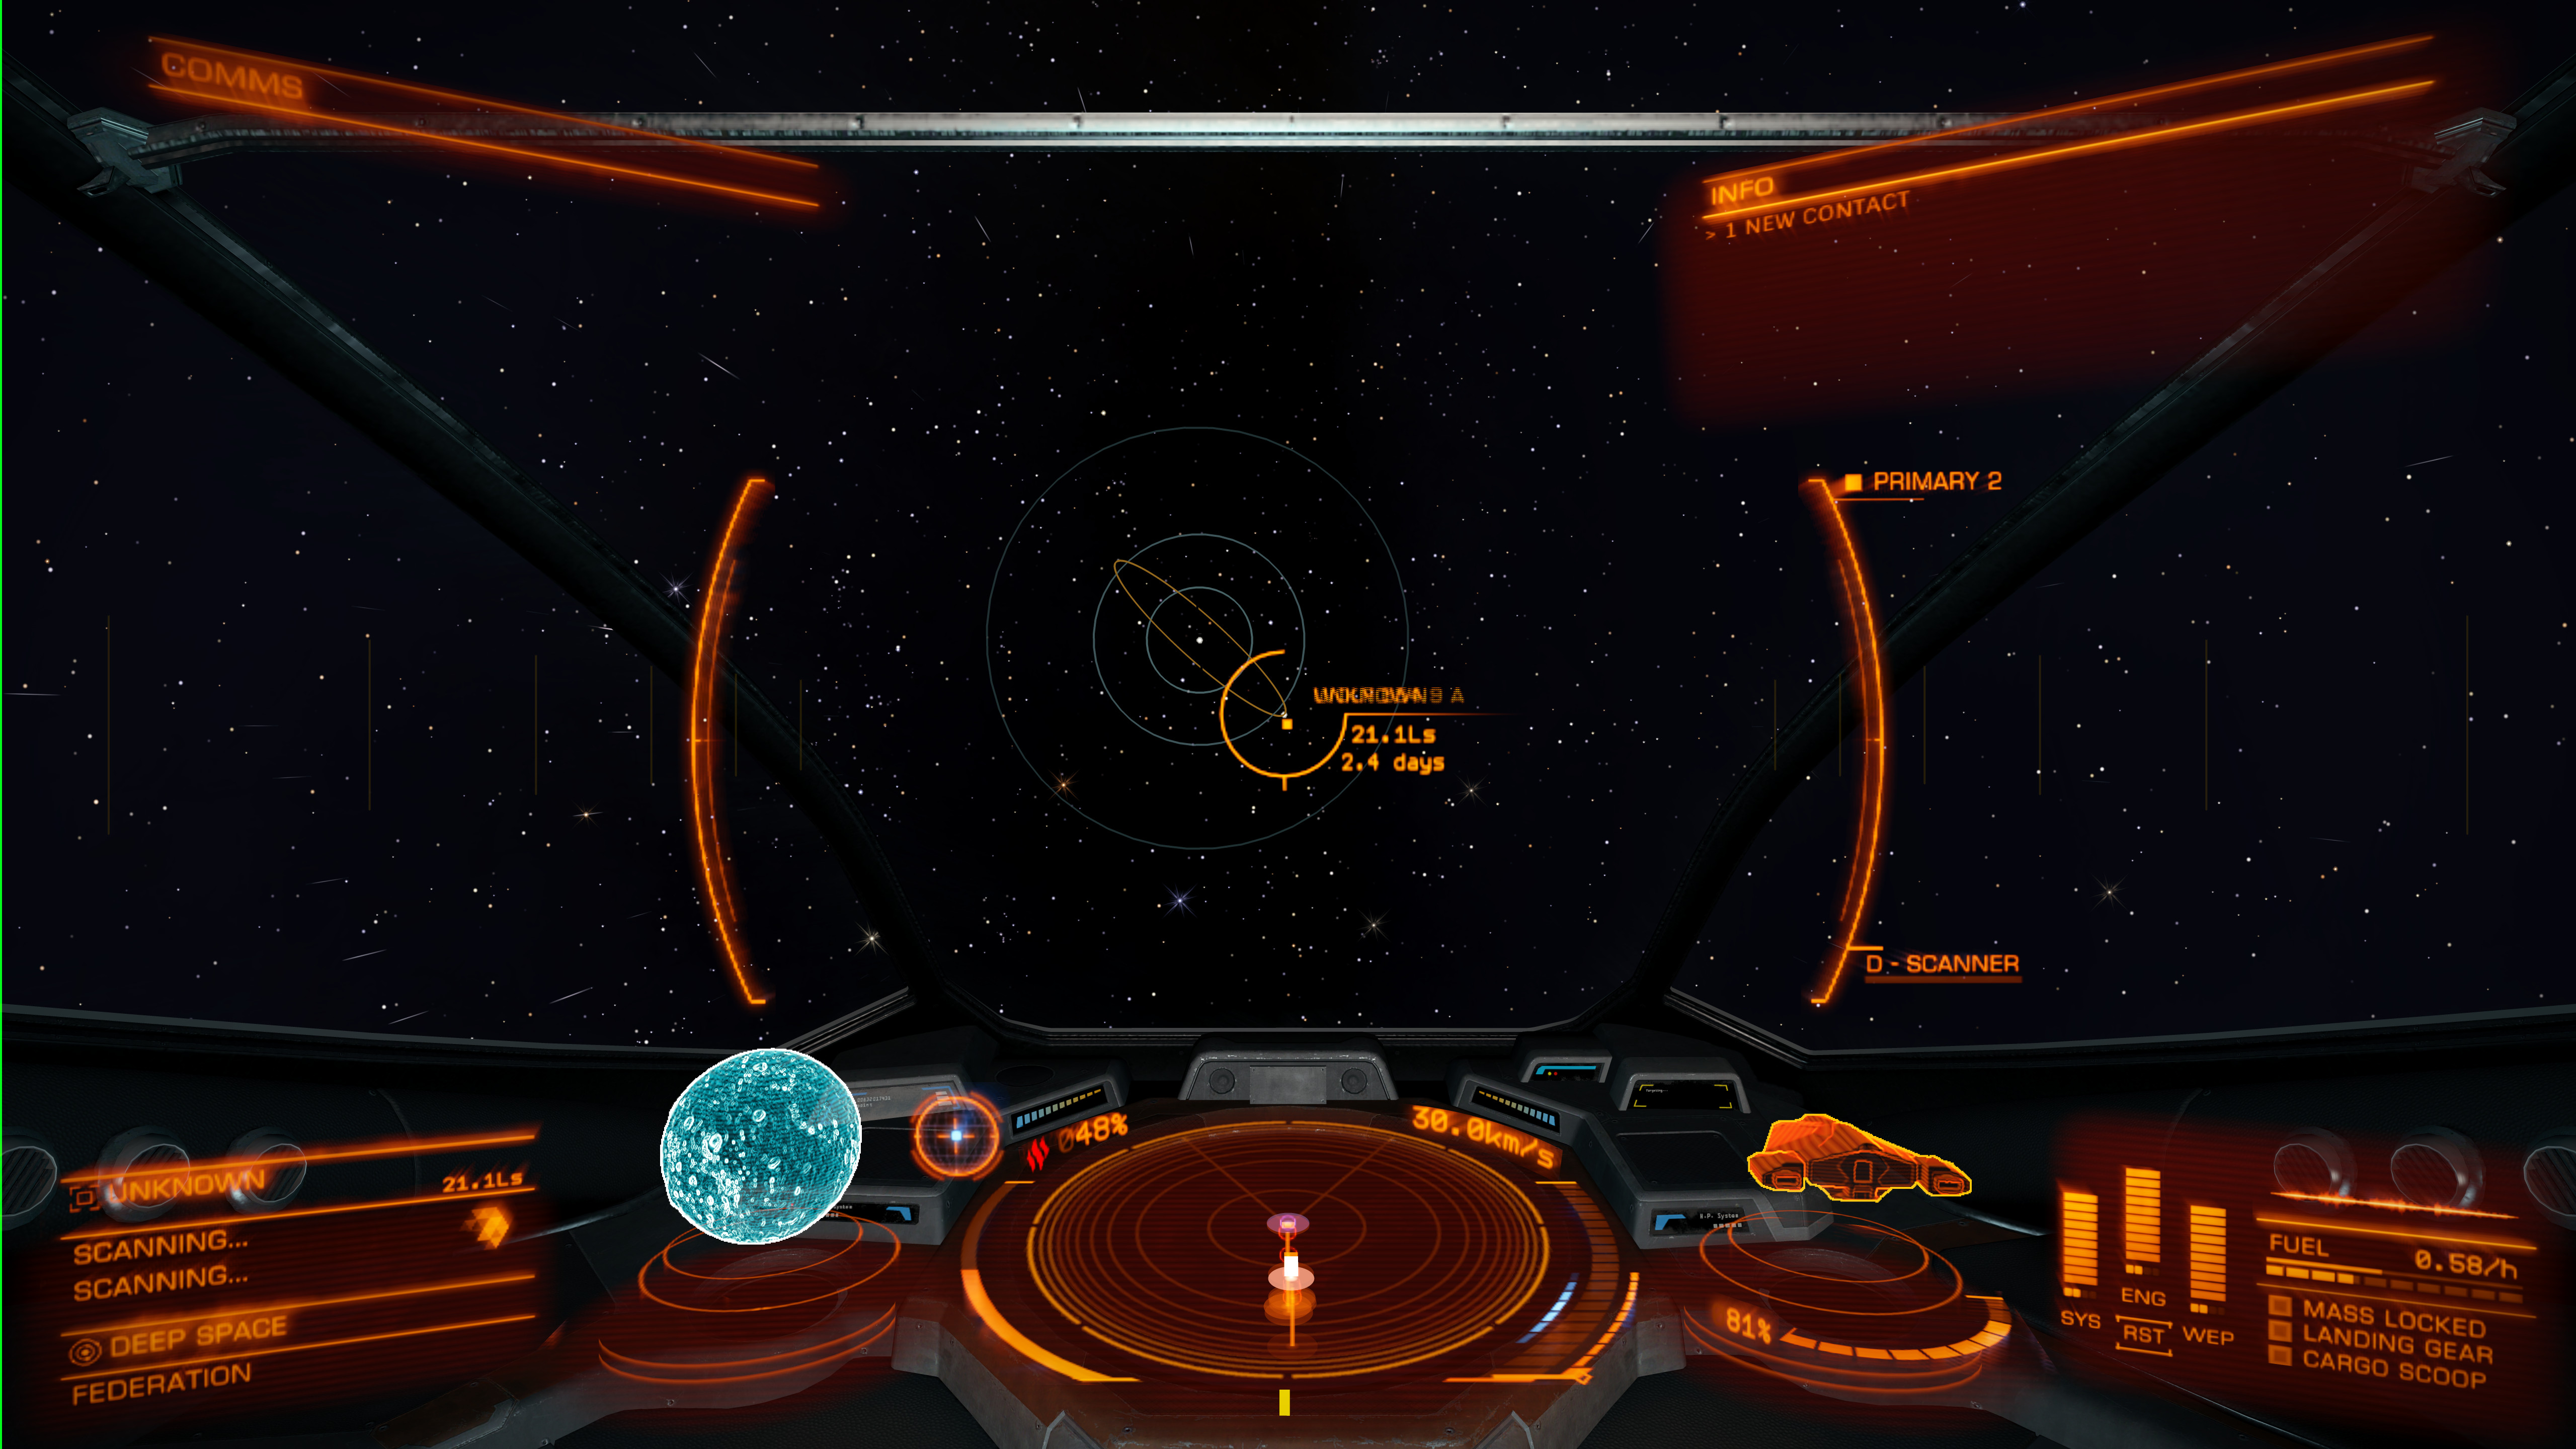
 Fig 2 - Scanning an unknown body
- If there are any unknown astronomical bodies found, a message will appear in the Info panel in your cockpit (see Figure 1 for an example of this message).
- Until you acquire an Advanced Discovery Scanner, many orbital bodies may not be within the range of your scanner when you first jump into the system.
- Surprisingly, you can find many of these with the naked eye by looking for “stars” that align or come close to aligning with the system's orbital plane (the yellow rings tracing the orbits of outlying bodies from the primary star).
- If you fly towards them at an angle and they start to “move” relative to other stars in the background, congratulations! You've found an orbital body that will be “discovered” once you get closer and fire your discovery scanner.
- In this way, you can efficiently locate and super cruise to bodies well outside the range of a Basic or Intermediate Discovery Scanner, even tens or hundreds of thousands of light seconds away! Just don't forget to fire your scanner again when you get close enough.
- Note that in some cases (such as outlying stars), these can be very far away, sometimes taking several minutes to approach in super cruise. It may often be more “profitable” to jump to the next system if you don't want to exhaustively search the current one.
- There are certain exceptions to this method. Some bodies will have very eccentric orbits that do not align to the system plane. Certain rare anomalies (such as black holes: example) will also have special properties that make finding them more challenging. Since the system map lists from nearest to furthest from the primary star and always maintains exact space for missing bodies, looking for contiguous bodies and “gaps” can be helpful for determining how far away bodies and anomalies might be, as well as how many bodies are orbiting them. Consulting the appropriate guides can also be helpful, should you wish to find these before obtaining an advanced scanner.
- Failing the approach above, you can fly around the system firing your discovery scanner randomly. This is not terribly efficient, but may occasionally surprise you with a body you missed.
- The best results when sweeping a system with a Basic Discovery Scanner appears to be to mix the two approaches, by repeatedly firing the scanner while you approach a more distant body that you've visually identified. Since repeatedly firing the scanner only costs a cooldown, there's no reason not to do this.
- If you now look at your navigation panel you'll see that you have 1, 2, 3 or even more “Unknown” bodies in your navigation list. Each of these bodies are ripe for exploring!
- Scanning Step
- To scan the unknown bodies you first need to target the unknown body and then directly face it.
- When you are close enough your ship will automatically start scanning the body and a progress indicator will be shown in your target information area of your ship with the message “Scanning…”. See Figure 2 for an example.
- You do not need to activate your discovery scanner for this scan.
- The distance from which the scan starts varies by the mass of the body - large ones like suns can be scanned from hundreds of Ls away, but less massive ones require you to get closer.
- The scan will complete in about 30 seconds and the body will stop being named “Unexplored” but will automatically get a name, e.g. “<Starname> 4”
- Continue scanning all other unknown bodies in the system.
- Jump back into known space and head back to the nearest station.
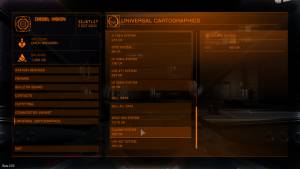 Fig 3 - Selling exploration data
- Once you have landed back at the station, go into the Universal Cartography section.
- Click on the each of the system's data you want to sell and you will get prompted to confirm - click ok to confirm and collect your credits. An example is shown in Figure 3.
- The more data you collected about a system the more valuable it is.

The equipment you get by default in your ship is the most basic available - there are enhanced pieces of equipment available at some stations that will increase your scanning capabilities and provide more valuable data. For example, the detailed surface scanner will substantially improve the detail and payout of data you turn in to a station.
If you have the detailed surface scanner installed, you don't need to activate it directly as it will automatically recover additional data during the usual scan.
Claiming/Naming
Up to Retail 1.0, there was no vanity-naming or “discovered by” label associated with exploring a system.
In Retail 1.1, there is still no vanity-naming, but bodies are be tagged with who sold exploration data about the body first (i.e. you must discover and then return and sell the discovery data before you get the “discovered by” label). These tags are permanent, and will be shown to all other players on their System Maps when highlighting the bodies you first discovered in that system.
The player to first discover a body will receive a +50% CR bonus for its data when sold. While dedicated scanning of profitable bodies others have first discovered can have a higher CR/time yield, this can be especially lucrative for rarer planets and star classifications.
When looking for large numbers of bodies and systems that will grant first discovery credit, consider the objectives of other players:
- Is your route NOT on a direct path from civilization to a popular region? (eg, nebulae, dark regions, known black holes, routes to faction capitals)
- How far away will you be scanning? Farther regions from civilization tend to be less explored, except for popular anomalies.
- Do the systems you're traversing contain multiple stars? There's a good chance secondary and tertiary stars will have unexplored bodies if they're far from the jump star in the system (eg, not efficient to super cruise to when exploring for profit).
- Are you on a route that is a relative straight line from starting systems? Consider jumping a few hundred Ly out, then taking a perpendicular route instead (thus giving you a higher probability of finding systems no one discovered).
- Are stars near you very close (<5 Ly) from each other? Consider jumping to them. Other players using Fastest Routing may have missed them.
While first discovery credit is by no means necessary for a successful career in exploring, the bonus and permanent discovery credit can feel incredibly rewarding, especially for newer explorers.
Payment
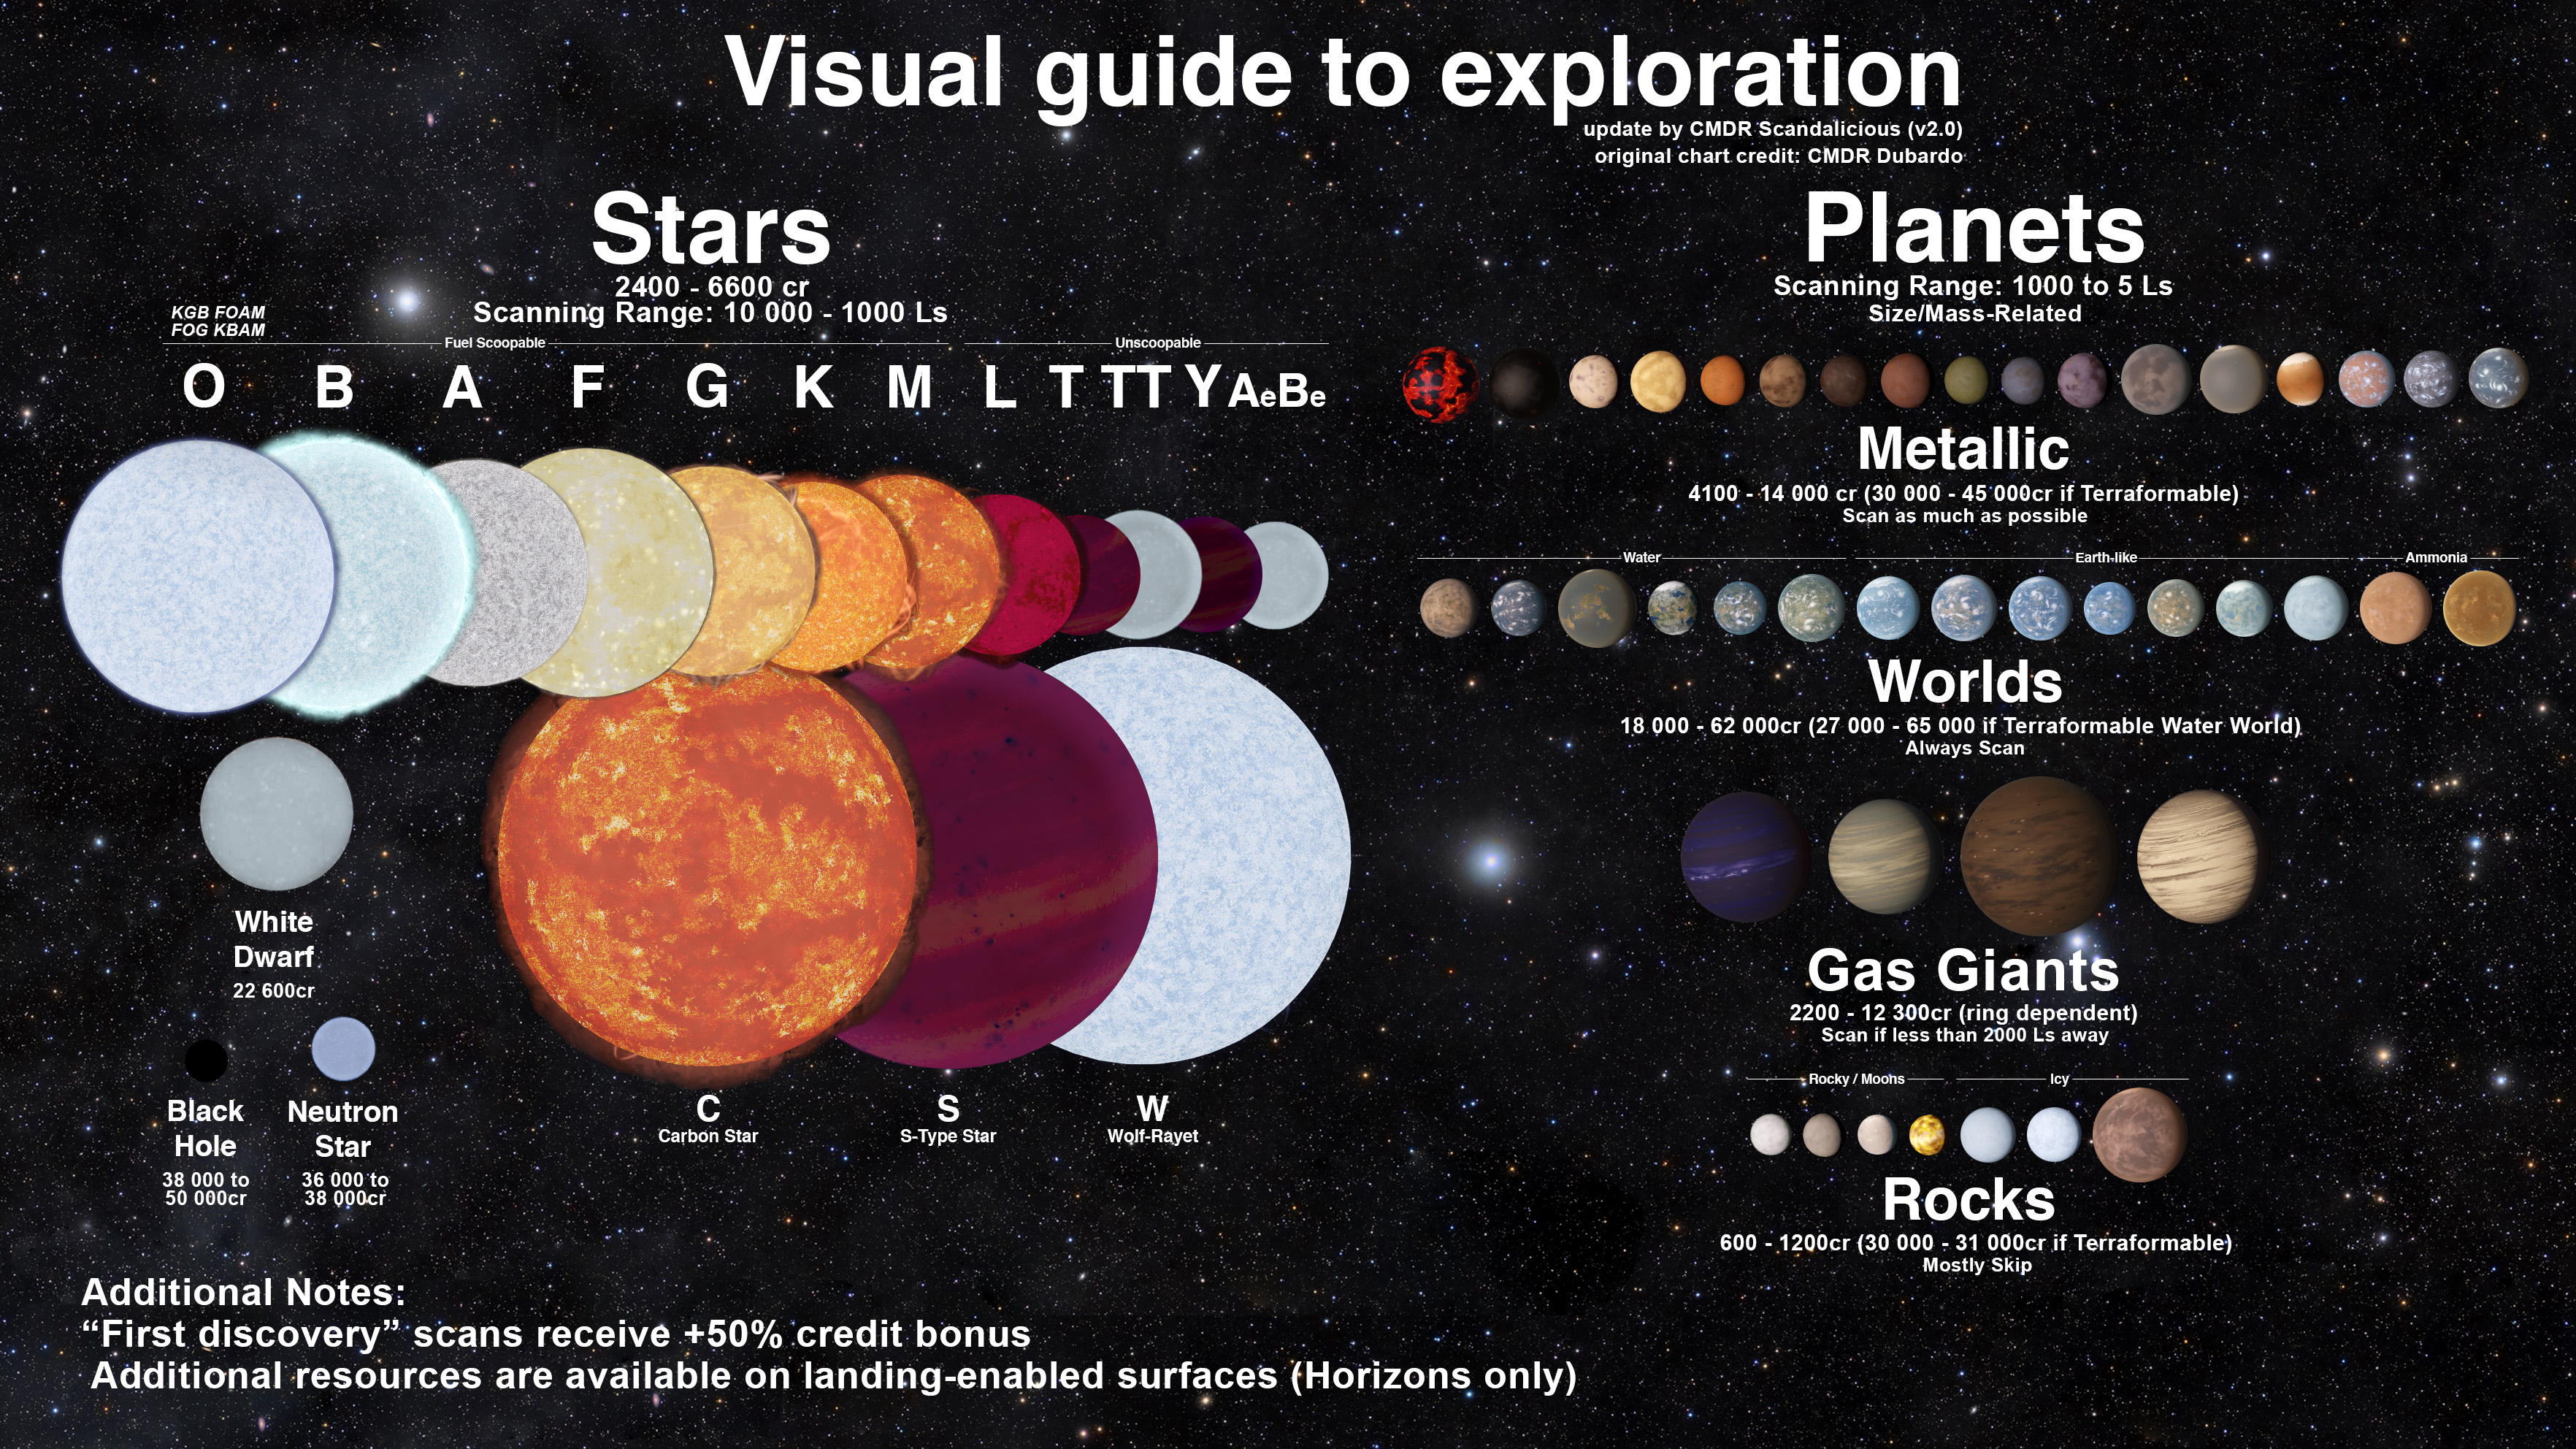
People on the forum have been working out the approximate payments for different types of stellar objects - source of this data came from the Frontier Forums. The great visual guide was created by Commander Dubardo and originally shared on Reddit.
/!\ Old prices below, need to be updated!
Please use the picture for price ranges.
| Star Type | Approx Value |
|---|---|
| Black Hole | 20,000 |
| Neutron Star | 19,000 |
| White Dwarf | 10,000 |
| A | 1,000-1,500 |
| B | 1,000-1,500 |
| C | 1,000-1,500 |
| F | 1,000-1,500 |
| G | 1,000-1,500 |
| K | 1,000-1,500 |
| L | 1,000-1,500 |
| M | 1,000-1,500 |
| O | 1,000-1,500 |
| S | 1,000-1,500 |
| T | 1,000-1,500 |
| TT | 1,000-1,500 |
| Y | 1,000-1,500 |
| W | 1,000-1,500 |
| Planet Type | Approx Value |
|---|---|
| Earth-like | 28,000-30,000 |
| Terraform Candidate | 22,000-30,000 |
| Water Worlds | 10,000-14,000 |
| Metal Rich | 4,000-6,000 |
| High Metal Content | 2,000-4,000 |
| Icy | 300-800 |
| Rocky | 300-400 |
| Other | Approx Value |
|---|---|
| Asteroid Belts | Zero |
| Rings | Zero |
Discovery Scanners Types
There are a few different discovery scanners. The basic one only has a discovery range of 500Ls, meaning that you might not scan all or even many of the possible bodies from a system's primary star. The Intermediate doubles this range, and the Advanced Discovery Scanner will detect all bodies in a system in one go, but costs about 1.5 million credits (compared to 1000 for the basic scanner)! Additionally, the distance at which the bodies are scanned increases - this range appears to vary with mass of the body being scanned.
Unless you've successfully bootstrapped your credits elsewhere, this means you will initially be relying heavily on the basic scanner.
| Scanner | Discovery Range | Approx Cost |
|---|---|---|
| Basic Discovery Scanner | 500Ls | 1,000 |
| Intermediate Discovery Scanner | 1000Ls | 500,000 |
| Advanced Discovery Scanner | Entire System | 1,500,000 |
While not a discovery scanner, the Detailed Surface Scanner is a 250,000 upgrade that substantially improves the payout of bodies you scan. Its purchase is relatively common at most stations, and it should be obtained at the first available opportunity (eg, before you even upgrade your discovery scanner).