Table of Contents
Elite Dangerous Cockpit
The cockpit (and HUD) in Elite Dangerous has many different areas that provide useful information. Despite the underlaying physical cockpit, the overlaid HUD remains largely the same between each ship.
As you can see, it is quite crowded, and it might not be immediately clear what each is for or what it is showing without some explanation!
1 - Scanner
The scanner shows objects in the area around you. It gives you a 3D view of the area around your ship, with objects appearing both above and below your current horizontal plane based on where those objects are in relation to your ship.
The vertical markings underneath the scanner itself show what zoom-level you're currently using for the scanner - the left-most section is the most zoomed in, the right-most the most zoomed out.
Ships/targets are shown as follows:
- Green - friendly ships
- Yellow - neutral ships
- Red - hostile ships
- White - non-ship objects (e.g. missiles, beacons)
- Asteroid outlines are shown in asteroid fields.
Ship Markers
Depending on what the ship is doing, the markers will change:
- Square marker - hard points retracted
- Triangle marker - hard points deployed
- Flashing-white - this ship is firing at you!
You can also work out what sort of player is on the scanner:
- Solid marker - NPC player
- Hollow marker - human player
Note that ships that have recently just jumped into the system or at the edge of your scanner range may not be properly scanned (e.g. flickering between triangle and square).
2 - Speed Indicator
The filled bars represent your current speed, whilst the horizontal bar represents the speed setting.
The blue section indicates the "sweet spot" where manoeuvrability is best.
3 - Ship Status
Shows the strength of your shield and hull strength, as well where on your ship the enemy weapon strikes are occurring.
4 - Power Configuration
This section shows the current power distribution of your ship's power systems.
5 - Heat Signature & Fuel
This is your current heat signature (if you are in silent-running mode this will display a blue “silent” message instead (and no signature) as well as your fuel gauge. Your fuel gauge has two bars - the lower one is the main fuel tank which is used for jumps etc; the upper one shows your reserve tank of fuel that is consumed to power the systems of your ship (the “burn rate” is shown in fuel units per second). When the reserve tank has emptied, a unit of fuel is transferred from the main tank.
This area also displays the status of the mass lock, cargo scoop and landing gear.
6 - Navigation Compass
The navigation compass is the small circular display near the scanner that gives you a simple view of where your current target is in relation to you. When solid the target is ahead of you, when hollow it is behind you.
7 - Heat Generation
This gauge shows how much heat you are generating at the moment. If this fills up to 100% you are getting very close to a thermal failure of your ship so try to disable systems to generate less heat and exit silent running mode if it is enabled.
8 - Target
This section shows your current target, with a similar representation as your own Ship Status panel showing the target's shield and hull strength.
9 - Target/Situational Information
This readout shows scanner information for your current target, such as range to target, or additional situational information such as jurisdiction.
10 - Comms
Communications (e.g. from other pilots and stations) will be shown here.
11 - Warnings
Several warning indicators will appear in this area based on your current situation:
- Proximity warning
- Impending impact warning
- Flight assist warning (shown when flight assist is disabled)
12 - Notifications
Notifications are shown here, for example if a bounty has been awarded.
13 - Flight Notices
Flight notices, such as which landing page to use or when safe-disengage is ready to be used, are displayed here.
Target Panel
Contains information about targets, such as sub systems & cargo.
Systems Panel
Contains information about your ship's systems such as firing groups and sub-system health.
Cockpit Damage
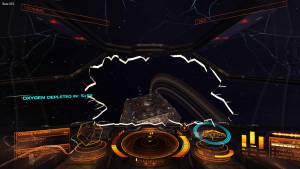
During dog fights in Elite Dangerous it is possible for your cockpit's canopy to crack, and in severe cases even to shatter entirely! If your canopy's glass does shatter you will not only start to lose oxygen from your ship, but you will also find that portions of your HUD are no longer visible as the glass that they were displayed on is now missing.
An example of this is shown in Figure 1 - as you can see the usual reticle and rotation indicators are missing making activities like docking difficult, but not impossible! By default you have 10 minutes of back-up oxygen which should be enough for you to get to the closest station and attempt to dock. Once your ship is inside the air lock in the station the oxygen count-down stops (as you are using the station's air) and you will be able to land.
Once you have landed, the cockpit canopy can be repaired via the life support system (there is not separate entry for it), but be prepared for a large bill as this is extensive damage.
